
While Magic Workstation (MWS) is the king of the hill to play free Magic games online, recently a new german software has started to get popular. We are talking about Cockatrice.
Cockatrice is an open source software that works on both PC and Mac developed by Max-Wilhelm (Bruker), Marcus Schütz and Marius van Zundert, and even though the game still is on its very early stages we can say it works great for the playtesting purposes. It doesn’t support tournaments yet, but, everything will come eventually!
Right after the break we’ll try to explain you some of the nice features Cockatrice has and help you install/configure it.
Installation:
1. Visit www.cockatrice.de to download and learn more about the project.

2. Install it following the instructions. It’s very simple! For those mac users out there, once installed you should have a folder in your applications that looks something like this:
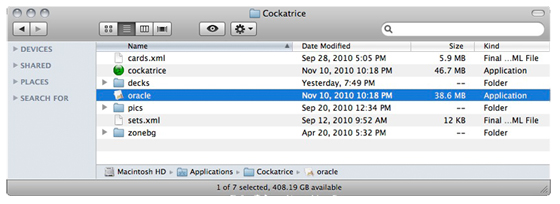 *Note: Don’t worry if you don’t have all the files yet. Nothing is wrong at this point if you don’t have the files cards.xml or sets.xml
3. Open the “Oracle” tool first. Yes, before actually running Cockatrice we need to run the Oracle to download all cards and sets information. Once you open the Oracle tool you’ll see that everything is empty and that you can’t really do much. So, what you have to do next is go to File -> Download sets information.

Now your Oracle should look like this:

Click on Start Download and wait a couple of minutes. You can close the Oracle once the download is finished.
*Note: By default the Unhinged and Unglued sets aren’t added. If you wish to add them too, feel free to mark them.
4. Open Cockatrice. When you open the program you’ll see an empty screen and not much to play with. It should look similar to this:

Boring, huh? Don’t worry! On your menu bar you’ll see 2 menus (in Mac both are named Cockatrice, hope they’ll fix that).
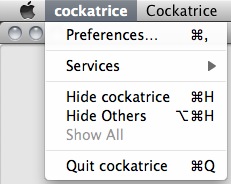 First thing you might want to do is to change the game preferences. For that, go to Cockatrice (the one in bold) -> Preferences. In there you can choose from many different options. My favorite one, and it’s definitely a MUST HAVE is the Download card pictures on the fly. This is a great feature that allows you to automatically download the cards while you are playing. You won’t need to download any pictures like you used to do in MWS. This is all automatic now.
The Preferences screen looks like this:

You can customize your own shortcut messages, or you can even add your own playmat for the battleground if you wish.
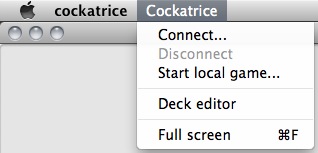 5. Create a deck. Before we actually play any games what we need to do is to have some decks to play with. For that what you want to do first is go to Cockatrice (non bold) -> Deck Editor. All your decks are automatically stored inside your Decks folder.
The deck editor feature allows you to create any deck and modify it at any time. Once opened it looks empty:

To add cards manually you can use the search box which dynamically shortens the search results at the same time you type in more characters from the card you are searching. By hitting “Return” you add the selected card to the maindeck, and by hitting “CTRL (or Command on mac) + Return” you add the selected card to the sideboard. There’s some tools in the mid-low part of the editor that allows you to modify your decklist by adding, reducing, deleting cards from it. The Deck editor works really nice and it doesn’t take more than 5 minutes to type in a whole deck.
This is an example of one of my decks:

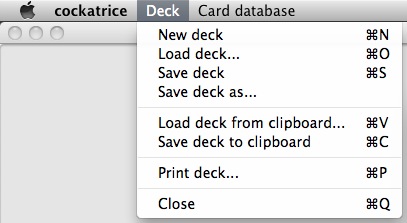 Once we got the deck ready, go to the menu to save it. As you can see there’s shortcuts for almost every function. Get used to use shortcuts as they’ll speed up a lot your gaming experience, specially when you play.
Once we got our deck(s) ready, is time for us to connect and play some games!
6. Connect to the server. The server used so far by the community is play.cockatrice.de. You can run your own servers if you wish, or you can also start a local game to playtest against the wall (*Note: This is a great feature to get sample hands). So let’s just connect:
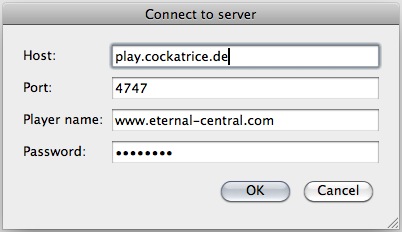
Port number should come as 4747 by default, then pick a name and a password and click “Ok”. Our game screen should now look something like this:

Take some time to get used to the interface. The right box is the user list. There you can see who’s online and if you want you can chat with them (double click on a name). The top box is where the open games appear once people has created them. One of the coolest features Cockatrice has, is the option to join games as an spectator. For that the first thing you need to do is to check on “Show full games”.
![]()
Then all the running games will show:

When joining a game as an spectator you can chat with them if they allowed spectators to chat. Sometimes players put a password to their games because they don’t want to reveal their super-secret-techs!
On the bottom/right side of the top box you’ll find the buttons that allow you to Create/Join/Join as spectator.
![]()
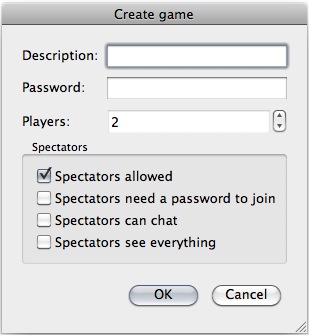 Let’s create our own game so the fun can start!
This is the screen you’ll get once you’ve clicked on the “Create” button. Set up the game description, add a password if you wish, number of players (2H giant is supported) and click among the spectator options.
*Note: If you are a privacy freak, you can also add a password for the spectators to join. That way only the people you granted the password will be able to join.
Once you’ve set everything up, a new screen should appear. This is where you’ll get your deck preview:

On the top left, you’ll find 3 buttons again: Load Local Deck / Load Deck from Server / Ready to start. You can’t play without a deck, so let’s just load the one we’ve created before.

*Note: That’s one sexy deck, isn’t it?
How do we load a deck from the server? Cockatrice allows you to upload decks to a server so you can play with your own decks wherever you are. This is a pretty cool feature! On the top of the screen you’ll see different tabs, one of them is the Deck Storage.
![]()
![]() To upload a deck to the server, just click the Deck storage tab. Then a new screen will show. On the left there are your local decks and on the right your decks on the server. Use the buttons bellow to move and delete decks, create folders, edit, etc…
To upload a deck to the server, just click the Deck storage tab. Then a new screen will show. On the left there are your local decks and on the right your decks on the server. Use the buttons bellow to move and delete decks, create folders, edit, etc…
![]()
Once we’ve created a game, we’ve upload a deck, what’s next? Get friends! You can either convince one of your msn mates to stop flirting online with school girls or wait for some random player to join your game. Once both players are “Ready to start” the game will begin.
7. Play the game. A new screen will show. This is the screen that simulates both battlefields and that has all the features to play Magic games online.
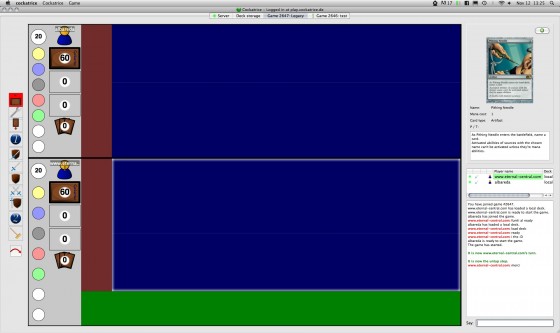
The screen is divided horizontally. We are the player underneath. The game areas are:
- The green area is our Hand.
- The blue area is the Battlefield. Our battlefield is divided as well, the bottom part is where all mana sources will go if we double click to play them from our hand, and the top part is where we’ll put our permanents.
- The left red area is the Stack.

On the very left of the screen we have the Phases bar. There you’ll find all the phases of the game.
*Note: There’s people who, to speed up the game drastically, don’t use the phases and leave it at the “Untap”. This way, you do most of the things as if you’d play in Real Life ®. Use the chat to send your messages by configuring shortcuts.
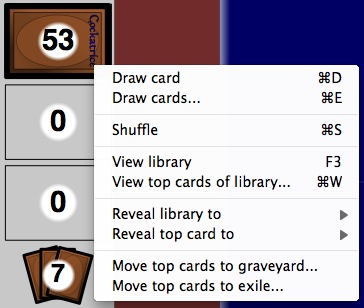
Then, between the phases bar and the play area, we’ll find some token buttons, our lives, and then (in order from top to bottom) the Library, Graveyard, Exiled and Cards in Hand count.
On the right side part of the screen we have the card preview (works on mouse over on a card), then a little box with the players and spectators and then the game log/chat. The game log is very useful as it allows us to keep track of everything our opponent is doing and, if needed, tell him to stop if he did something wrong. Just underneath the game log there’s the chat box where we can type in whatever we need.
These are some of the shortcuts you should use the most:
CTRL or COMMAND +
+ i = Roll a dice.
+ s = Shuffle.
+ d = Draw a card.
+ e = Draw cards.
+ m = Draw 7 cards / Mulligan.
+ w = Watch the top cards of your library.
+ u = Untap all your permanents
+ t = Create a token
+ a = Attach to card (Equipments)
+ r = Remove all local arrows
And then,
F2 to conced the game
F3 to watch your Library
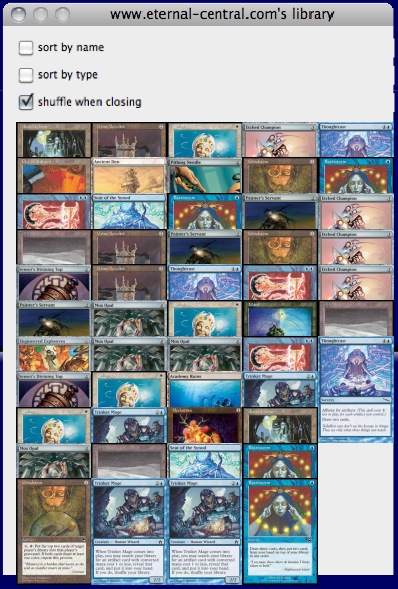
*Note: You can sort your Library view by name or type to speed up your searches.
F4 to watch your Graveyard
If you added custom messages like “EOT”, “Go”, “In response”, etc… those shortcuts are CTRL or COMMAND + 1,2,3,4,… numbers.
What else do you need to know?
Game arrows
You can create game arrows to point things out, like creatures blocking, or spell targets. To create an arrow (such as the one in the picture), you have to hold the right click button of your mouse from the initial card to the desired target.

Library options
Some options are kind of tricky, for example: “How to show your opponent the top card of your library when he’s using Jace 2.0 on you”. For that, if you right click on your library you’ll get plenty of options there, including the “Reveal top card to…”
Changing Live Totals and Tokens
Right Click on the Live Count Circle or one of the Colored Token Circles will make +1 to it.
Left Click on the Live Count Circle or one of the Colored Token Circles will make -1 to it.
The very bottom white circle is the Storm Count.
And finally, if there’s anything you don’t know how to do, you can find most of the game options inside the Game Menu on the top menu bar. And remember, you can also ask your opponent for assistance!
This is pretty much it. We hope you guys enjoy Cockatrice as much as we are already. The game will only get better and better as it’s constantly improving thanks to the wonderful job done so far.
If you come up with any suggestions/bugs about the game, please contact the Cockatrice staff team or leave them a post at the forum board that you can find at www.cockatrice.de
